Thursday, May 5, 2016

Root,Unroot,CWM,and how to Flash Galaxy Ace S5830i , increase RAM ROM

While searching for custom ROM, I found below information over internet. I am sharing it with you.
This guide is for s5830i ONLY!!DON'T USE FOR s5830!!It can damage your phone!!
DO NOT TRY FLASHING SOFTWARE FOR OTHER DEVICE!IT WILL BRICK YOUR PHONE!!!READ CAREFUL ALL THE POSTS!!
How to root Galaxy Ace s5830i.
1.Put update.zip in your main directory in the SD card.
2.Turn off your phone.
3.Boot in Recovery by pressing:POWER+VOLUME UP+HOME buttons.
4.In Recovery select Install zip from sd
5.Choose update.zip
6.Reboot your phone and it's ready.There must be a Superuser icon in your Apps menu.

How to unroot
1.Exactly the same just put the file unroot in your main directory and folow the steps.

ClockWorkRecovery
1.Put the file ClockWorkRec5830i.zip in your main directory in SD again.
2.Turn off phone.
3.Boot in Recovery and select apply update.zip
4.Select ClockWorkRec5830i.
5.You have CWR but don't delete ClockWorkRec5830i.zip from the SD because
every time you want to use it you must install it from the SD!!


Flashing s5830i with Odin v1.85
1.Turn off the phone and put it in Download mode by pressing Power+Volume Up+volume down.
2.Open Odin v1.84.Run as Administrator!.
3.Put the files in Odin and don't touch the settings
4.If it's a one-file firmware put it in PDA section.
If it's multiple put the files in the correct section.
5.Click start and don't touch the phone!Don't turn off computer and don't unplug the phone!It will reboot automatically and the first boot will take some time,so don't panic!

If you have "bricked" your s5830i a.k.a stuck at samsung logo just download Odin and flash PDA.tar form the link.
http://www.4shared.com/file/Ls2CAsHv/PDA.html
Everything you're doing is up to you!I'm not responsible if you don't read!There's a binary counter on s5830i so be careful with flashing!

Update:samfirmware.com provide us with odin 1.84 with .pit file for our phone so from now on you can flash firmware from samfirmware.com without problems.

If I helped you,press the thanks button
Attached Files
File Type: zip ClockWorkRec5830i.zip - [Click for QR Code] (1.31 MB, 500526 views)
File Type: zip update.zip - [Click for QR Code] (1.11 MB, 437888 views)
File Type: zip unroot.zip - [Click for QR Code] (101.4 KB, 119275 views)
File Type: rar S5830I_Downloader.rar - [Click for QR Code] (666.6 KB, 120095 views)

Mounting a VirtualBox hard disk image file (.vdi) in Linux

  • On/Up-to Fedora 19 (You can try these steps on Fedora 20 and others too), you need to install these packages:

  • # yum install nbd qemu-common

    # yum install qemu-kvm


  • To mount a partition on a hard disk image file:

  • # modprobe nbd
    # sudo qemu-nbd -c /dev/nbd0 "file.vdi"

    # sudo kpartx -a /dev/nbd0 // creates mapped devices in /dev/mapper/
    # sudo mount /dev/mapper/nbd0p1 /some/destination/folder // mounts first partition of the image.


  • To unmount:

  • # sudo umount /some/destination/folder
    # sudo kpartx -d /dev/nbd0
    # sudo qemu-nbd -d /dev/nbd0

Monday, December 3, 2012

How to Install, Build and Use the Boost C++ libraries for development with the Eclipse IDE using the MinGW compiler on a Windows Platform

h1

How to Install, Build and Use the Boost C++ libraries for development with the Eclipse IDE using the MinGW compiler on a Windows Platform


December 04, 2012
This article outlines how to install, build and use the Boost C++ libraries for development with the Eclipse IDE using the MinGW compiler on a Windows platform.  The article will cover all steps including:
  • Downloading and installing the Eclipse C++ IDE.
  • Downloading and installing the MinGW (GCC, G++, GDB, etc) compiler toolchain.
  • Downloading and installing the Boost library sources.
  • Compiling and running a simple program that uses the Boost header files only.
  • How to build the complete set of Boost binary libraries.
  • How to configure a C++ project in Eclipse IDE to include and link the Boost C++ binary libraries.
  • Finally, we will compile and run a simple program to verify the Boost libraries are correctly installed, built and can be used by your C++ projects.

Overview

We begin by providing a brief overview of the various software components we use in this article.  All of the software components mentioned in this article are free to use for opensource and commercial development.  There are some excellent resources and tutorials included in the references section at the end of this article.  In particular, I have provided references to free online tutorials for C++ programming, and cookbook recipes for C++ and the Boost Libraries.  A cookbook is a collection of hundreds of practical solutions (recipes) to problems that programmers face, with the goal of demonstrating a language’s capabilities and the relative simplicity of implementing them.
What are the Boost C++ libraries?
The Boost C++ Libraries are a collection of free libraries that extend the functionality of C++.  The current Boost release contains over 80 individual libraries (an overview of the libraries are provided here).
Why should a developer/organization use the Boost Libraries?
  • In a word, Productivity. High-quality libraries like Boost speeds initial development, results in fewer bugs, reduces reinvention-of-the-wheel, and cuts long-term maintenance costs.
  • The Boost C++ libraries are open-source and peer-reviewed.
  • The Boost C++ libraries are platform independent and work on almost any modern operating system, including UNIX and Windows variants.
  • The Boost C++ libraries complements the Standard Template Library (STL) rather than replaces it.
  • The Boost C++ libraries are well documented.
  • Most of the Boost libraries are licensed under the Boost Software License, designed to allow Boost to be used with both free and proprietary software projects.
What is the Eclipse C++ IDE?
The Eclipse CDT Project provides a fully functional C and C++ Integrated Development Environment based on the Eclipse platform. Features include: support for project creation and managed build for various toolchains, standard make build, source navigation, various source knowledge tools, such as type hierarchy, call graph, include browser, macro definition browser, code editor with syntax highlighting, folding and hyperlink navigation, source code refactoring and code generation, visual debugging tools, including memory, registers, and disassembly viewers.
What is MinGW?
MinGW, a contraction of “Minimalist GNU for Windows”, is a port of theGNU Compiler Collection (GCC), and GNU Binutils, for use in the development of native Microsoft Windows applications. Offered in easily installed binary package format, for native deployment on MS-Windows, or user-built from source, for cross-hosted use on Unix or GNU/Linux, the suite exploits Microsoft’s standard system DLLs to provide the C-Runtime and Windows API.

1.  Installation of the Eclipse IDE

Download and install the Eclipse for C++ (CDT) IDE.
  1. Ensure you have the Java SE Runtime Environment (JRE) installed.  The Eclipse IDE requires that the Java JRE or JDK be installed in order to run.
  2. Download the Eclipse CDT IDE.  The downloaded file will have a name similar to:eclipse-cpp-helios-win32.zip
  3. Extract the downloaded file to the following folder: c:\software
  4. Thus, the full path to the eclipse installation should be:c:\software\eclipse
  5. The Eclipse IDE has an extensive inbuilt help menu with detailed user guides and tutorials.

2.  Installation of the MinGW Compiler Toolchain

Download and install the MinGW Compiler toolchain.  Previously, the various components of the GNU toolchain had to be installed individually and manually.  More recently, we can install the entire MinGW toolchain  in one operation from within the Eclipse IDE.
  1. Within the Eclipse IDE, from the menubar, select:  Help | Install New Software.
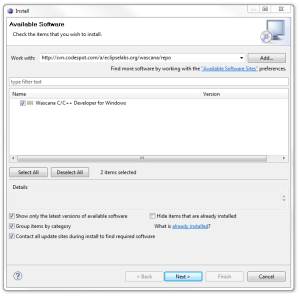
  2. Enter in the Wascana repository URL (the latest version may be obtained from here) :  http://svn.codespot.com/a/eclipselabs.org/wascana/repo
  3. Select the packages that appear and follow the on-screen prompts until the installation is complete.  The package displayed may be:Wascana C/C++ Developer for Windows
  4. The MinGW toolchain will be installed at the following location:c:\software\eclipse\mingwStep 2.1 of this article is illustrated in the following figure:
    MinGW Toolchain Installation (Wascana)
  5. Verify the Eclipse C++ IDE and MinGW toolchain are correct installed and configured by following the simple tutorial from the Eclipse IDE Welcome page.
    1. Within the Eclipse IDE, from the menubar, select: Help | Welcome.
    2. Select: Overview | C/C++ Development | C/C++ Development User Guide | Getting Started | Create a simple Application.
    3. Ensure you can complete the tutorial successfully, before proceeding on (Ensure you can successfully build and run the HelloWorld application).

3.  Installation of the Boost C++ Library Sources

Install the Boost C++ Library sources and header files.  The most important reference for the remainder of this article  is the Boost Getting Started on Windows guide.  You should read the guide in parallel with this article.  However, the guide is written with Visual Studio developers in mind.  In this article, we outline the steps for users of the Eclipse IDE with the MinGW compiler toolchain.  At the time of writing, the current version of the Boost C++ library is 1.44.0.  You should always choose to install the latest version.
  1. Download the latest version of the Boost C++ Libraries.
  2. Extract the zip file to the folder: c:\software
  3. Thus, the full path to the Boost C++ Library installation folder is: c:\software\boost_1_44_0

4.  Configure the Eclipse C++ projects to use the Boost C++ Library Headers

All Eclipse C++ projects using the Boost libraries must include the Boost C++ Library installation folder in the include paths.
Using the Getting Started on Windows guide, follow the tutorial Build a Simple Program Using Boost.  The example will use a header-only library.  The simple program reads a sequence of integers from standard input, uses Boost.Lambda to multiply each number by three, and writes them to standard output.
  1. Create a new project as previously illustrated in the HelloWorld Tutorial (suggested new project name is BoostLamdaExample1).
  2. Then create a new source file called example.cpp and cut-and-paste the sample source code from the section Build a Simple Program Using Boost of the guide.
  3. Include the Boost C++ Library installation folder in the include paths of the BoostLamdaExample1 project.
    1. Within the Eclipse IDE, within the project explorer on the left-hand-side, select the C++ project using the Boost libraries.
    2. Right-click over the C++ project and select properties from the context menu.
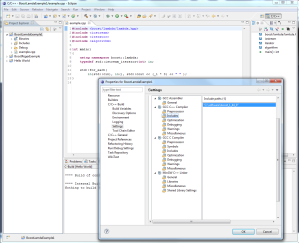
    3. From within the Properties dialog box, insert the full path of the boost C++ Library installation folder into the following:
      1. C/C++ Build | Settings | GCC C++ Compiler | Includes
      1. C/C++ Build | Settings | GCC G Compiler | Includes
        Step 4.3 of this article is illustrated in the following figure:
        Eclipse IDE Boost Include Path
  4. Build the project BoostLamdaExample1. (Ctrl-B)
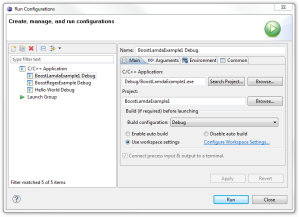
  5. Verify the Run Configuration is correct.
    1. From the menubar, select Run | Run Configurations.
    2. Select the BoostLamdaExample1 application.
    3. Verify all the parameters appear correct.
      The Run Configuration is illustrated in the following figure:
      BoostLamdaExample1 Run Configuration
  6. Run the project BoostLamdaExample1.
  7. Enter the input data in the console tab:1 2 3
  8. Input to exit the program.
  9. If you are able to run the program successfully, then you have built and run a C++ application using a Boost header library.

5.  Compile and build the Boost C++ Binary Libraries

The Boost C++ Libraries come as source code.  Most of the Boost libraries are header-only libraries.  They consist of header files containing templates and inline functions and do not require separately compiled binary libraries or special treatment when linking.  Although most of the libraries consist solely of header files, there are some important binary libraries required and thus, they must be built.
There are prebuilt binaries of the Boost C++ library for Visual Studio (and only Visual Studio) available for free and may be downloaded from:  BoostPro
We are using the Eclipse C++ IDE with MinGW and so we must compile and build the Boost C++ binary libraries ourselves. We will use Bjam.  Bjam is the command-line tool that drives the Boost Build system. To build Boost binaries, we invoke bjam from the Boost C++ Library installation folder.  We will first update two batch files to ensure the build process will proceed smoothly.
  1. Set the toolset to GCC.
    1. Edit the file: c:\software\boost_1_44_0\bootstrap.bat
    2. Replace the following line:
      set toolset=msvcwith the line:set toolset=gcc
    3. Save and exit the file.
  2. Update the build batch file with the correct location of the MinGW toolchain (compiler and linker).
    1. Edit the file:c:\software\boost_1_44_0\tools\jam\src\build.bat
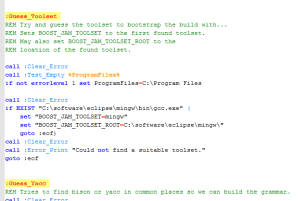
    2. Under the procedure :Guess_toolset, update the MinGW entry to point to the correct folder:
      call :Clear_Error
      if EXIST "C:\software\eclipse\mingw\bin\gcc.exe" (
      set "BOOST_JAM_TOOLSET=mingw"
      set "BOOST_JAM_TOOLSET_ROOT=C:\software\eclipse\mingw\"
      goto :eof)
    3. Optionally, remove all other blocks of code similar to the above codeblock from the procedure :Guess_toolset. This is advisable because you may find that the build procedure quickly exits with the error message saying it cannot find the compiler.  Removing all other codeblocks will ensure the compiler and toolset are set correctly.
      The following figure illustrates the complete :Guess_toolsetprocedure in my version of build.bat.
      GuessToolkit Procedure
  3. Compile and Build the Boost C++ Library binaries from the command prompt.
    1. Open up a command prompt at:  c:\software\boost_1_44_0
    2. Add the MinGW bin folder to the PATH.
      set PATH=c:\software\eclipse\mingw\bin;%PATH%
    3. Optionally, add python to the end of the PATH.  (Obviously, you may need to download and install it).
      set PATH=%PATH%;c:\python27;
    4. Enter the command:
      booststrap

      This should successfully build the executable Bjam.  If not, please review steps 5.1, 5.2 and 5.3.
    5. Build the Boost Library binaries by issuing the following command (This may take over 2hrs to complete):
      bjam --toolset=gcc  --build-dir=c:\software\boost_1_44_0\build  --build-type=complete  stage
      1. The newly built Boost C++ Binary Libraries are generated in the folder:c:\software\boost_1_44_0\stage\lib
      2. The option:--build-type=completewill generate both debug and release builds of the Boost C++ libraries.  This is suitable for developers.
      3. The option:--build-type=minimalwill generate release builds only of the Boost C++ libraries.   This may become an issue for developers who want to create debug builds of their projects.  Since the compiler automatically try to link against the debug builds of the Boost C++ Libraries, an error message is displayed.
      4. The declaration of stage or install specifies whether the Boost C++ Libraries are installed in a subfolder namedstage or system-wide. The meaning of system-wide depends on the operating system. In Windows, the target directory is c:\boost,  in Linux it is /usr/local. The target directory can also be explicitly specified using the –prefixoption.
      5. The intermediate files are generated in the build folder:c:\software\boost_1_44_0\buildYou may delete the build folder when the entire build process has completed.
      6. If you have a multi-core processor, you can accelerate the build process.  The option:-j Nwill run up to n shell commands concurrently. The default is 1.  I have an Extreme Quad-Core processor, and adding the option -j 4 reduced the build time from just over 2hrs to just under 40 minutes.

6.  Configure the Eclipse C++ projects to use the Boost C++ Binary Libraries

  1. All Eclipse C++ project using the Boost C++ binary libraries must include the Boost Binary Library folder in the Libraries (-L) settings.
    1. From with the Eclipse IDE, right-click on the selected project and select Properties.
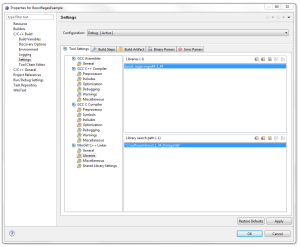
    2. Place the Boost Binary Library folder path c:\software\boost_1_44_0\stage\lib in the following location:
      C/C++ Build | Settings | MinGW C++ Linker | Libraries | Library search path (-L).
  2. All Eclipse C++ projects using a specific Boost C++ binary library must include the specific binary library in the Libraries (-l) settings.
    1. From with the Eclipse IDE, right-click on the selected project and select Properties.
    2. Place the name of the specific binary library in the following location:
      C/C++ Build | Settings | MinGW C++ Linker | Libraries | Libraries (-l).
    3. IMPORTANT: To link a Boost C++ Binary library, e.g.:libboost_regex-mgw44-1_44.athe command line option should be:-lboost_regex-mgw44-1_44(i.e.: Remove the prefix lib and the postfix .a).
  3. Step 6 in this article is illustrated in the following figure:
    Boost Binary Library Folder Configuration

7.  Final step – Verify we can use the Boost C++ Binary Libraries from a sample application.

  1. Using the Getting Started on Windows guide, follow the example Link Your Program to a Boost Library.  To demonstrate linking with a Boost binary library, the sample program extracts the subject lines from emails. It uses the Boost.Regex library, which has a separately-compiled binary component.
  2. Create a new C++ project in Eclipse called BoostRegexExample1 and create a new source file called regex.cpp.
  3. Cut-and-paste the sample code from the section Link Your Program to a Boost Library of the guide into regex.cpp.
  4. Add the Boost installation folder to the Include Path of theBoostRegexExample1 project as indicated in step 4.3 of this article.
  5. Add the Boost Library binary folder to the Library (-L) Path of theBoostRegexExample1 project as indicated in step 6.1 of this article.
  6. Add the specific Boost Regex Binary Library boost_regex-mgw44-1_44to the library (-l) settings as indicated in step 6.2 of this article.
    1. To find the name of a specific library, please browse the Boost Library binary folder, and select the library filename such that it is the shortest filename with the prefix libboost_regex. The similar looking filenames refer to the same library compiled with different options (statically linked, dynamically link, release-build, debug-build, and so on).
  7. Compile and build (Ctrl-B) the project:  BoostRegexExample1.
  8. Verify the Run Configuration parameters are correct:
    1. From the Eclipse IDE menubar, select Run | Run Configurations.
    2. Ensure the BoostRegexExample1 C++ application is selected.
    3. Ensure the Build configuration is set to Debug.
    4. Click Run.
  9. Cut-and-paste the following sample email into the console as input:
    To: Bob
    From: Mary
    Subject: The test is successful
    Body: Great news, Boost Library integration works.
  10. If the following message is printed out, then the program ran successfully (using the Boost Binary Library Regex).
    The test is successful
  11. To exit the program, input Ctrl-Z to the console.
  12. Congratulations! You may now use the Boost Libraries in your C++ application from the Eclipse CDT IDE using the MinGW toolchain.

References

  • Eclipse C++ IDE – Free fully functional C and C++ Integrated Development Environment.
  • Boost C++ Libraries – Free peer-reviewed portable C++ source libraries.
  • MinGW -  Free port of the GNU Compiler Collection (GCC), and GNU Binutils, for use in the development of native Microsoft Windows applications.
  • Wascana - Wascana is the Eclipse C/C++ IDE for the Windows along with the MinGW GNU toolchain.
  • LearnCpp.com – Free website devoted to teaching you to program in C++.
  • Online C++ Cookbook. – Excellent resource for Java, C++, C#, Oracle and SQL developers.
  • The Boost C++ Libraries Book – An online book providing an overview on using the Boost C++ libraries.  The book is released under aCreative Commons License.
  • cdtdoug.blogspot.com – Personal blog of the Eclipse CDT project  leader providing insights into his mind and the future directions of the project.

Wednesday, January 18, 2012

Setting up a server for PXE network booting

If you're looking to perform a lot of system recovery, or system installation, then network booting with PXE is ideal. PXE allows you to boot up a system and have it automatically get an IP address via DHCP and start booting a kernel over the network.
PXE itself stands for "Pre-boot eXecution Environment", which describes how it works in the sense that the clients using it haven't booted in a traditional manner.
In order to use PXE you need to setup a boot-server which will allow client systems to :
  • Request an IP address (via DHCP)
  • Download a kernel (via TFTP)
With both of these services in place any system which supports PXE/network-booting (you might need to enable it in the BIOS) should be able to gain an IP address, fetch a kernel, and boot without an installed operating system.
(This is ideal for systems which can't be booted by a traditional approach; for example your new AMD-64 system which doesn't have a CD/DVD drive!)
Our Setup
For the purposes of this article we'll assume:
  • We're working with a small network 192.168.1.0/24
  • We'll allow all local machines to boot and get an IP address via DHCP from the range 196.168.1.70-192.168.1.100
  • Our "boot-server" is the host "prashant" with IP address 192.168.1.50
  • We will serve the same kernel to each host.
In our example we'll configure a PXE-server which will allow remote systems to run the Debian Etch installer, but nothing here is specific to that. PXE allows you to configure a system to boot from an arbitrary kernel (and matching ramdisk if you wish to use one). With the correct configuration you can even cause the clients to mount a remote file-system via NFS and have a diskless thin-client system.
TFTP Setup
TFTP is a very simple file-transfer protocol, which is very similar to FTP but which doesn't use any kind of authentication. If you're not already running a TFTP server you can install one by running:
root@prashant:~# apt-get install tftpd-hpa 
Once installed you'll need to enable it by editing the file /etc/default/tftpd-hpa. You should change RUN_DAEMON to yes, leaving you with contents like these:
#Defaults for tftpd-hpa RUN_DAEMON="yes" OPTIONS="-l -s /var/lib/tftpboot" 
Now create the root directory, if it is missing, and start the server:
root@prashant:~# mkdir -p /var/lib/tftpboot 
root@prashant:~# /etc/init.d/tftpd-hpa start Starting HPA's tftpd: in.tftpd. 
Once our systems have retrieved an IP address via DHCP they will request files from beneath the /var/lib/tftpboot root directory. We'll come back to the contents of this directory shortly.
DHCP Setup
If you don't already have a DHCP server configured upon your LAN you'll need to install one. If you're using a small home router, or similar, to provide local DHCP services you must disable this first. (Since we require the DHCP server to pass back some extra options to clients which the majority of routers won't allow).
Discussing a full DHCP installation is mostly beyond the scope of this introduction but the thing we're trying to do is fairly simple. The goal of the DHCP server in this setup is twofold:
  • We obviously want to use it to allow clients to request and receive an IP address.
  • We want to cause the DHCP "answer" to give some extra details to the clients which are requesting an address:
    • The address of the TFTP server.
    • The initial filename to request from the TFTP server.
The most common DHCP server is the dhcp-server package, and you can install this by running:
root@prashant:~# apt-get install dhcp3-server 
Once installed the server is configured in the file /etc/dhcp3/dhcpd.conf, and there are a lot of available options described there. For our example we'll use the following configuration:
option domain-name-servers 62.31.64.39, 62.31.112.39; 
default-lease-time 86400; max-lease-time 604800; authoritative;  

subnet 192.168.1.0 netmask 255.255.255.0 {range 192.168.1.70 192.168.1.100;

filename "pxelinux.0";

next-server 192.168.1.50;

option subnet-mask 255.255.255.0;

option broadcast-address 192.168.1.255;
option routers 192.168.1.1; } 
Here we've configured the server to give out IP addresses from the range 192.168.1.70-100, set the default gateway to be 192.168.1.1 and use our ISP's nameservers.
We've also used next-server to point to the TFTP server we're using (which is the same host as our DHCP server, but doesn't need to be). We've chosen the default name of pxelinux.0 as the name of the file for booting clients to request.
Using dnsmasq instead
Personally I use the dnsmasq package to provide DHCP services upon my LAN, since this is small and simple and provides other useful abilities, setting up PXE booting with dnsmasq just requires the addition of the following line to /etc/dnsmasq.conf:
dhcp-boot=pxelinux.0,prashant,192.168.1.50 
(Again we've setup the filename along with the name and IP address of the TFTP server which is "prashant" / 192.168.1.50 in this example)
Restarting the service after this change is as simple as:
root@prashant:~# /etc/init.d/dnsmasq restart Restarting DNS forwarder and DHCP server: dnsmasq. 
PXE Configuration
Now that we've configured the TFTP and DHCP servers we need to go back and complete the configuration. By default when a client boots up it will use its own MAC address to specify which configuration file to read - however after trying several options it will fall back to requesting a default file.
We need to create that that file, which will contain the list of kernels which are available to boot, we'll firstly need to create a directory to hold it:
root@prashant:~# mkdir /var/lib/tftpboot/pxelinux.cfg 
Now save the following as /var/lib/tftpboot/pxelinux.cfg/default:
DISPLAY boot.txt  DEFAULT etch_i386_install  LABEL etch_i386_install         

kernel debian/etch/i386/linux         

append vga=normal initrd=debian/etch/i386/initrd.gz  -- LABEL etch_i386_linux         

kernel debian/etch/i386/linux         append vga=normal initrd=debian/etch/i386/initrd.gz  --  LABEL etch_i386_expert         

kernel debian/etch/i386/linux         append priority=low vga=normal initrd=debian/etch/i386/initrd.gz  --  LABEL etch_i386_rescue         

kernel debian/etch/i386/linux         append vga=normal initrd=debian/etch/i386/initrd.gz  rescue/enable=true --  PROMPT 1 TIMEOUT 0 
This file instructs the client to display the contents of the file boot.txt so create that too:
- Boot Menu - =============  etch_i386_install etch_i386_linux etch_i386_expert etch_i386_rescue 
The only remaining job is to download the official Etch installer kernel and associated files and save them in the directories specified in the default file we created:
root@prashant:~# cd /var/lib/tftpboot/ 

root@prashant:~# wget http://ftp.uk.debian.org/debian/dists/etch/main/installer-i386/current/images/netboot/debian-installer/i386/pxelinux.0  

root@prashant:~# mkdir -p /var/lib/tftpboot/debian/etch/i386 

root@prashant:~# cd /var/lib/tftpboot/debian/etch/i386 

root@prashant:~# wget http://ftp.uk.debian.org/debian/dists/etch/main/installer-i386/current/images/netboot/debian-installer/i386/linux 

root@prashant:~# wget http://ftp.uk.debian.org/debian/dists/etch/main/installer-i386/current/images/netboot/debian-installer/i386/initrd.gz 
When these commands have been completed we'll have the following structure:
root@prashant:~# tree /var/lib/tftpboot/

 /var/lib/tftpboot/ 

|-- boot.txt 

|-- debian 

|   `-- etch 

|       `-- i386 

|           |-- initrd.gz 

|           `-- linux 

|-- pxelinux.0 

`-- pxelinux.cfg     

`-- default   
4 directories, 5 files

 
(We only used debian/etch here in case we want to offer other installers in the future. You can put everything in one directory if you wish, just update pxelinux.cfg/default to match.)
We should now be ready to test the setup.
We've installed a pxelinux.0 file which will instruct booting clients to request pxelinux.cfg/default. This will then make a list of boot options available, which are displayed by the simple boot menu file we created.
The files which are used for booting are stored beneath the TFTP root directory and thus accessible to booting clients.
Sample Run
A sample remote boot looks like this:
PXE entry point found (we hope) at 9AE5:00D6 

My IP address seems to be C0A80146 192.168.1.70 

FTFTP prefix: 

Trying to load: pxelinux.cfg/01-00-14-22-a1-53-85 

Trying to load: pxelinux.cfg/C0A80146 

Trying to load: pxelinux.cfg/C0A8014 

Trying to load: pxelinux.cfg/C0A801 

Trying to load: pxelinux.cfg/C0A80 

Trying to load: pxelinux.cfg/C0A8 

Trying to load: pxelinux.cfg/C0A 

Trying to load: pxelinux.cfg/C0 

Trying to load: pxelinux.cfg/C 

Trying to load: pxelinux.cfg/default 

- Boot Menu - 

=============  

etch_i386_install 

etch_i386_linux 

etch_i386_expert 

etch_i386_rescue 
As you can see the system here attempted to load several configuration files, based upon its MAC address (01-00-14-22-a1-53-85) initially then falling back to the octets in the IP address it was given by DHCP (192.167.1.70).
Finally it managed to load a working configuration using the last-chance default file we created. This in turn instructed it to show the boot menu we created.
From here on the system will boot into whichever kernel you specify. (We could configure the system to time-out here and just boot into a default option, but we didn't.)
From here on you should understand how PXE can be used to boot an arbitrary kernel and initial ram-disk. Later we'll look at mounting a remote file-system over NFS to provide a disk-less thin-client.

Thursday, August 4, 2011

Install google chrome with wine in Ubuntu

Google Chrome is an open source web browser developed by Google. The name is derived from the graphical user interface frame, or “chrome”, of web browsers.Chromium is the name of the open source project behind Google Chrome,released under the BSD license.


Note:- Wine 1.1.4 has been released, and includes fixes for running Chrome.You need to make sure you have the wine version 1.1.4 installed

Install latest wine in Ubuntu

New WINE releases arrive every two weeks; the version in Ubuntu 8.04’s repository is already out-of-date. To be able to run Windows applications as well as possible, you should stay with the latest WINE releases.

Using GUI

Open System->Administration->Software Sources, and select the Third Party Software tab. Click Add and paste in the official WINE Ubuntu repository

deb http://wine.budgetdedicated.com/apt hardy main

When prompted, reload the repositories. Install the package wine from your package manager. Whenever a new version of WINE is released, you should see it in your Ubuntu updates.

Using Command line

First you need to edit the /etc/apt/sources.list

sudo gedit /etc/apt/sources.list

add the following line save and exit

deb http://wine.budgetdedicated.com/apt hardy main

Update the source list file using the following command

sudo aptitude update

Install wine using the following command

sudo aptitude install wine

After installing you can check the wine version using the following command

wine --version

You need to make sure wine version is 1.1.4

Google’s net-installer for Chrome doesn’t work in Wine. Instead, use the standalone installer.Download it from here http://gpdl.google.com/chrome/install/149.27/chrome_installer.exe

Now you need to Open a terminal to and change to the directory you downloaded the installer to. Run the installer with Wine using the following command

wine chrome_installer.exe

The installation should complete.Now you need to Start Google Chrome and the Chrome window should open, but will appear to be broken. Close Chrome for now.

Run Chome with the–-new-http and –-in-process-plugins options to make it work (the command below is all one line):

wine ~/.wine/drive_c/windows/profiles/$USER/Local\ Settings/Application\ Data/Google/Chrome/Application/chrome.exe --new-http --in-process-plugins

Use the previous command whenever you want to start Chrome. At this point Chrome is working fine, but the fonts are not good looking. The fonts can be improved by using winetricks

Install winetricks using the following commands

wget http://www.kegel.com/wine/winetricks

chmod +x winetricks

./winetricks corefonts tahoma

Install chromium browser For ubuntu

We have already discussed how to install google chrome using wine .Chromium is an open-source browser project that aims to build a safer, faster, and more stable way for all Internet users to experience the web. The Chromium codebase is the basis for Google’s Chrome browser.
First you can use this tutorial to install chromium in Ubuntu using PPAs and after that you can try any one of the following methods.

First you need to download .deb package from here using the following command

wget http://media.codeweavers.com/pub/crossover/chromium/cxchromium_0.9.0-1_i386.deb

Now you have cxchromium_0.9.0-1_i386.deb package install this package using the following command

sudo dpkg -i cxchromium_0.9.0-1_i386.deb

Using Ubuntu PPA

First you need edit /etc/apt/sources.list file

gksudo gedit /etc/apt/sources.list

Add the following two lines for Ubuntu 9.04 (Jaunty) Users

deb http://ppa.launchpad.net/chromium-daily/ppa/ubuntu jaunty main
deb-src http://ppa.launchpad.net/chromium-daily/ppa/ubuntu jaunty main

For ubuntu 9.10 (Karmic) Users add the following two lines

deb http://ppa.launchpad.net/chromium-daily/ppa/ubuntu karmic main
deb-src http://ppa.launchpad.net/chromium-daily/ppa/ubuntu karmic main

For ubuntu 10.04 (Lucid) Users add the following two lines

deb http://ppa.launchpad.net/chromium-daily/ppa/ubuntu lucid main
deb-src http://ppa.launchpad.net/chromium-daily/ppa/ubuntu lucid main

save and exit the file

Now add the GPG key using the following command

sudo apt-key adv --recv-keys --keyserver keyserver.ubuntu.com 0xfbef0d696de1c72ba5a835fe5a9bf3bb4e5e17b5

or For karmic users use the following command

sudo add-apt-key ppa:chromium-daily/ppa

Update source list

sudo apt-get update

Install chromium browser using the following command

sudo apt-get install chromium-browser

#
This will complete the installation

If you want to open chromium go to Applications->CrossOver Chromium->Chromium

Sunday, July 17, 2011

Things to do after install fedora 15

Things to do after install fedora 15 is a good quesiton always. For a Complete desktop for a user we need more softwares for MP3, DVD and Video playback/recording etc… For this reason you have to install that software from third party repositories. RPM Fusion is a third party repository consists all of other softwares for better media support.

Gnome shell Tweaks for Fedora 15

You need some tweaks for gnome shell to use in fedora 15. You can have the gnome-tweak-tool to tweak the settings, interface, fonts, themes etc..

Just install

yum install gnome-tweak-tool

Dconf Editor for Fedora 15

The dconf editor will help you to set various values in gnome shell. like enable the minimize, maximize buttons, show seconds in the clock etc..

—–

For the complete installation of gnome shell extensions in fedora 15 and more gnome shell themes, gtk 3 themes in fedora 15 just view the other post gnome shell extensions in fedora 15.

For GUI people just open the overlay mode in gnome or press window key. then type add then you will get add or remove programmes then go for a search.

Open Terminal Applications > System Tools > Terminal. then su – for a root user . Enter your root password. All the commands are performed as root on the terminal otherwise just add su -c ‘command’ .

Prepare Yum for Fast Installation in Fedora 15

* Fastest Mirror Plugin

yum install yum-fastestmirror

The fasterstmirror will find the fastest mirror near you and download with great speed.

Enable Restricted Repositories in Fedora 15

To enable the RPM Fusion repository just install

su -c 'yum localinstall --nogpgcheck http://download1.rpmfusion.org/free/fedora/rpmfusion-free-release-stable.noarch.rpm   http://download1.rpmfusion.org/nonfree/fedora/rpmfusion-nonfree-release-stable.noarch.rpm'

Install Adobe Acrobat Reader in Fedora 15

Next we add the adobe repository for downloading Acrobat Reader, by running this at the terminal

rpm -Uvh http://linuxdownload.adobe.com/adobe-release/adobe-release-i386-1.0-1.noarch.rpm
rpm --import /etc/pki/rpm-gpg/RPM-GPG-KEY-adobe-linux
yum install AdobeReader_enu

Just Start the Acrobat Reader from Applicaitons > office > Acrobat reader.

Internet Applicaitons for fedora 15

The firefox 4.0.1 is the default browser in fedora 15. But Chrome is a better alternative. You can add the repository and install google chrome on fedora 15 very easly.

Installing Google chrome in Fedora 15

To add the google repository edit the file.

gedit /etc/yum.repos.d/google.repo

for 32 bit OS Version

[google]

name=Google - i386ff
baseurl=http://dl.google.com/linux/rpm/stable/i386
enabled=1
gpgcheck=1
gpgkey=https://dl-ssl.google.com/linux/linux_signing_key.pub

for 64-bit OS Version

[google64]
name=Google - x86_64
baseurl=http://dl.google.com/linux/rpm/stable/x86_64
enabled=1
gpgcheck=1
gpgkey=https://dl-ssl.google.com/linux/linux_signing_key.pub

Install Google Chrome Stable Version on Fedora 15

Just type this line on the root terminal

yum install google-chrome-stable

Or You can download the google chrome browser from chrome website. Download the rpm file

to install you need the dependency lsb

to install that

yum install redhat-lsb

Then try to install the downloaded rpm by just double click on it or in terminal

rpm -ivh google-chrome-stable_current.rpm

Install Opera on Fedora 15

You can download Opera browser from opera’s Official Webiste. Opera is the most advanced browser with HTML 5 and CSS 3 support.

Just double click on the rpm will install the browser without a hazile.

Install Pidgin on Fedora 15

Pidgin is an alternative for the default empathy IM Client. Some times it works better with webcams.

yum install pidgin

Install Google talk Plugin in Fedora 15

Just download the rpm from Google Talk Website and install it. Download from http://www.google.com/chat/video/download.html .

Just double click on the rpm on the downloads. Type the root password. It will automatically install.

Install skype on Fedora 15

Skype is a good IM client for all operating system. You can chat, Video and Audio call with unmatched voice clarity and video quality over internet.

Just download from skype website.

Just double click on the rpm. It will install automatically.

Install Google talk on Fedora 15

The google talk plugin will help you to call your friends from gmail interface. It now supports video calling. You can download this plugin from google website

Install Gwibber on Fedora 15

Gwibber is a universal Broadcast Client for twitter, identi.ca, Buzz, Flickr, FriendsFeed, Facebook, Ping.fm, Qwaiku etc.. It is the default Broadcast client on Ubuntu. Installation is simple.

yum install gwibber

Install Google Earth on Fedora 15

The most advanced map software from google. You can search and find lot more . Just download the bin file and execute it.

./GoogleEarthLinx.bin

Flash Player Plugin for fedora 15

yum install flash-plugin

Graphics Appications for fedora 15

Gimp

the most advanced Image Editor in Linux. The latest Coming Version will have great features. This is included in the default package. If not just install

yum install gimp

Inkscape

The best vector editor application in free software. Good for creating svg files.

yum install inkscape

Google Picasa

picasa application for organizing and editing digital photos. You can download picasa from google.

rpm, for Red Hat/Fedora/Suse/Mandriva i386 or x86_64:
http://dl.google.com/linux/rpm/testing/i386/picasa-3.0-current.i386.rpm

Xara Xtreme

Xara is a powerful, general purpose graphics program for Unix platforms including Linux, FreeBSD and (in development) OS-X.

» Download Xara Xtreme (version 0.7 Revision 1692) (Autopackage Archive – 19MB)

Detailed Installation Instructions here.

Phatch

Phatch is a simple to use cross-platform GUI Photo Batch Processor which handles all popular image formats and can duplicate (sub)folder hierarchies. Phatch can batch re-size, rotate, apply perspective, shadows, rounded corners, … and more in minutes instead of hours or days if you do it manually. Phatch allows you to use EXIF and IPTC tags for renaming and data stamping. Phatch also supports a console version to batch photos on web-servers.

yum install phatch nautilus-phatch

Office Applications for Fedora 15

Libreoffice is the official office package for Fedora 15

The total libreoffice package is available on the DVD package. You can install openoffice.org seperatly.

Libre Office 3.3.0 on Fedora 15

LibreOffice is a productivity suite that is compatible with other major office suites, and available on a variety of platforms. It is the clone of Openoffice.org from document foundation. Lot of improvements and bug fixes from openoffice.org done by the libreoffice team. Also other distros are supporting this office suite.

Download : Libreoffice

Extract the file and install

rpm -ivh RPMS/*.rpm

Scribus on fedora 15

Scribus is an desktop open source page layout program with the aim of producing commercial grade output in PDF and Postscript, primarily, though not exclusively for Linux.While the goals of the program are for ease of use and simple easy to understand tools, Scribus offers support for professional publishing features, such as CMYK color, easy PDF creation, Encapsulated Postscript import/export and creation of color separations.

yum install scribus

Video Codecs for Fedora 15

To play various Video formats we need some codecs.

Gstreamer

yum install gstreamer gstreamer-plugins-good gstreamer-plugins-bad gstreamer-plugins-ugly

FFMpeg

FFMpeg is a complete and free Internet live audio and video broadcasting solution for Linux/Unix. It also includes a digital VCR. It can encode in real time in many formats including MPEG1 audio and video, MPEG4, h263, ac3, asf, avi, real, mjpeg, and flash.

yum install ffmpeg ffmpeg-libs

K3b MP3 decoder plugin

When you start k3b it says no mp3 decoder plugin. to install

yum install k3b-extras-freeworld

DVD and Video Players for Fedora 15

DVD playback

In order to play DVDs you must install the appropriate codecs.

yum install libdvdread libdvdnav lsdvd

you can use Livna for installing libdvdcss.

su -
rpm -Uvh http://rpm.livna.org/livna-release.rpm
yum install libdvdcss

VLC

VLC media player is a highly portable multimedia player and multimedia framework capable of reading most audio and video formats as well as DVDs, Audio CDs VCDs, and various streaming protocols. It can also be used as a media converter or a server to stream in uni-cast or multi-cast in IPv4 or IPv6 on networks.

yum install vlc

Mplayer / SMplayer / Gnome Mplayer

MPlayer is a movie player that plays most MPEG, VOB, AVI, OGG/OGM, VIVO, ASF/WMA/WMV, QT/MOV/MP4, FLI, RM, NuppelVideo, yuv4mpeg, FILM, RoQ, and PVA files. You can also use it to watch VCDs, SVCDs, DVDs, 3ivx, RealMedia, and DivX movies. It supports a wide range of output drivers including X11, XVideo, DGA, OpenGL, SVGAlib, fbdev, AAlib, DirectFB etc. There are also nice antialiased shaded subtitles and OSD.

yum install mplayer mplayer-gui smplayer gnome-mplayer

Kaffeine

Kaffeine is KDE Mediaplayer with xine engine.

yum install kaffeine

Avidemux

Avidemux is a very good video editor. Install it like this


yum install avidemux


Mp3 and Audio Players for Fedora 15.

Audacity

Audacity is a cross-platform multitrack audio editor. It allows you to record sounds directly or to import files in various formats. It features a few simple effects, all of the editing features you should need, and unlimited undo. The GUI was built with wxWidgets and the audio I/O supports PulseAudio, OSS and ALSA under Linux. This

build has support for mp3 and ffmpeg import/export.

yum install audacity

Or you can install Audacity with mp3 export support.

yum install audacity-freeworld

Audacious

Audacious is a media player that currently uses a skinned user interface (based on Winamp 2.x skins) as well as a separate GTK2 based front end. Historically, it started as a fork of Beep Media Player (BMP), which itself forked from XMMS.

yum install audacious audacious-libs audacious-plugins audacious-plugins-freeworld audacious-plugins-freeworld-aac audacious-plugins-freeworld-ffaudio audacious-plugins-freeworld-mp3

Banshee

Banshee allows you to import CDs, sync your music collection to an iPod, play music directly from an iPod, create playlists with songs from your library, and create audio and MP3 CDs from subsets of your library.

yum install banshee banshee-community-extensions

Xmms

XMMS is a multimedia (Ogg Vorbis, CDs) player for the X Window System with an interface similar to Winamp’s. XMMS supports playlists and streaming content and has a configurable interface.

yum install xmms xmms-mp3